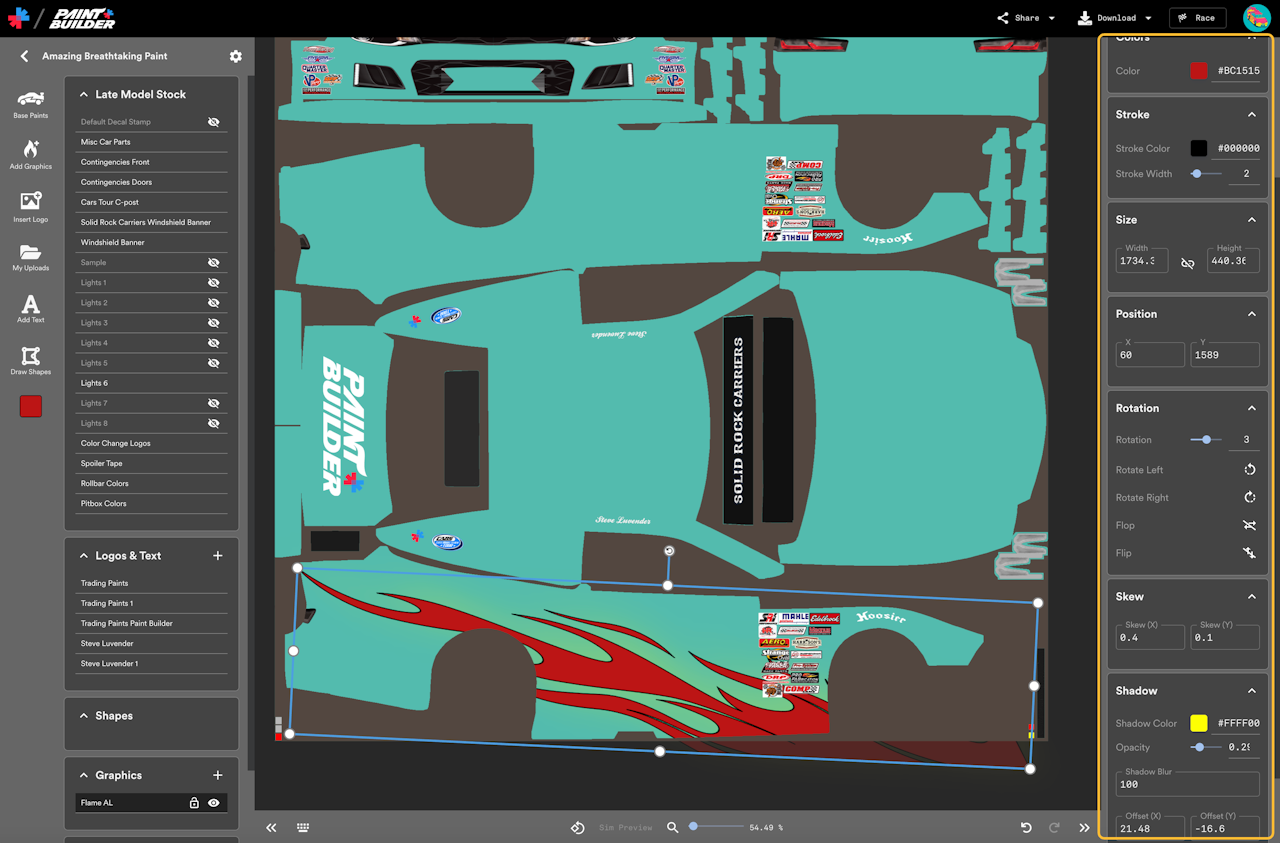
Adding Graphics to your Paint Builder project
Graphics in Paint Builder
For the sake of this guide, Graphics refers to premade graphical elements available in the Add Graphics menu of Paint Builder.
Paint Builder comes with hundreds of original, exclusive customizable shapes and designs called Graphics. Graphics range from flames to splashes to graffiti to angles, and far beyond.
Graphics can be customized in numerous ways so you can make your Paint Builder project truly your own. They’re also vector graphics, meaning they can be stretched and resized without becoming pixelated in Paint Builder.
Inserting graphical elements to your Paint Builder project
To add Graphics to your Paint Builder project, click Add Graphics from the tools menu on the left of the screen.
A list of Graphics will appear. Scroll through the list to find the shape you want, and then click it to add it to your project instantly, where you can resize, rearrange, and customize any way you wish.
Customizing Graphics in Paint Builder

You can customize Graphics within Paint Builder in many ways. Select a graphic from the canvas area or the layers list to begin customizing it using the sidebar properties panel.
General
- Opacity: Change the transparency of the layer
- Visibility: Hide or show the selected layer
- Locking: Lock the layer to prevent accidental movement or changes
Rename the selected layer by entering a new name at the top of the sidebar properties panel, just above the General group.
Colors
- Color: Change the fill color of the layer
Stroke
- Stroke Color: Change the outline color of the layer
- Stroke Width: Change the thickness of the outline (set to 0 to remove the stroke entirely)
Size
Manually set the size of the layer. You can also use the handles on the canvas area to change the size.
The lock button toggles locking and unlocking of proportions. If proportions are locked, any changes made to sizing will retain the layer’s current aspect ratio. If they’re unlocked, you can adjust the height and width independently.
If editing via the layer’s handles on the canvas area, you can hold Shift while dragging to temporarily change this option.
Position
Manually set the positioning of the layer on the canvas. You can also click and drag the layer on the canvas.
You can also use your keyboard’s arrow keys (or Shift + arrow keys to go faster) to reposition the selected layer on the canvas.
Rotation
- Rotation: The value in degrees that the layer is rotated from its original rotation.
- Rotate Left: Rotate the selected layer 90 additional degrees to the left.
- Rotate Right: Rotate the selected layer 90 additional degrees to the right.
- Flop: Mirror/reflect the selected layer horizontally.
- Flip: Mirror/reflect the selected layer vertically.
You can also use the rotation handle to rotate the selected layer on the canvas.
Skew
Distort the selected layer by slanting it on either its X or Y axis. A little bit goes a long way!
Shadow
- Shadow Color: The color of the outer glow or shadow on the selected layer. Remove the color fill to disable the shadow.
- Opacity: The visibility & transparency of the shadow. Higher opacity is more visibility.
- Shadow Blur: The density of the shadow. A low number will display an almost solid shadow, while a higher number will blur the shadow further from the layer, creating almost an airbrush effect behind the layer.
- Offset: Change the positioning of the shadow relative to the layer.